Building Servers with Node.js and Express, Part 2
23 Jan 2016In this post: Express, Express Router, MySQL
Last time, we talked about some basic express server implementations, and how to handle setup, basic request handling, and a couple additional features. In this post I want to take a big leap forward and go in depth on a server implementation I used for a recent project. Some topics we'll cover include general server architecture, middleware, security, routing, achieving modularity with controllers and models, and how to integrate our server with a database.
One thing I really want to highlight is the importance of modularity in our server, and how always keeping our server architecture in mind can help us build something that is both scalable and highly readable.
The server used in this example is from a spacecraft data visualization application I've been working on. You can check out the site here: Loftus.xyz/tycho
Or visit the repo for the full code Project Page
I want to start with an architecture diagram of the server, discussing what the main components are and how they work together.
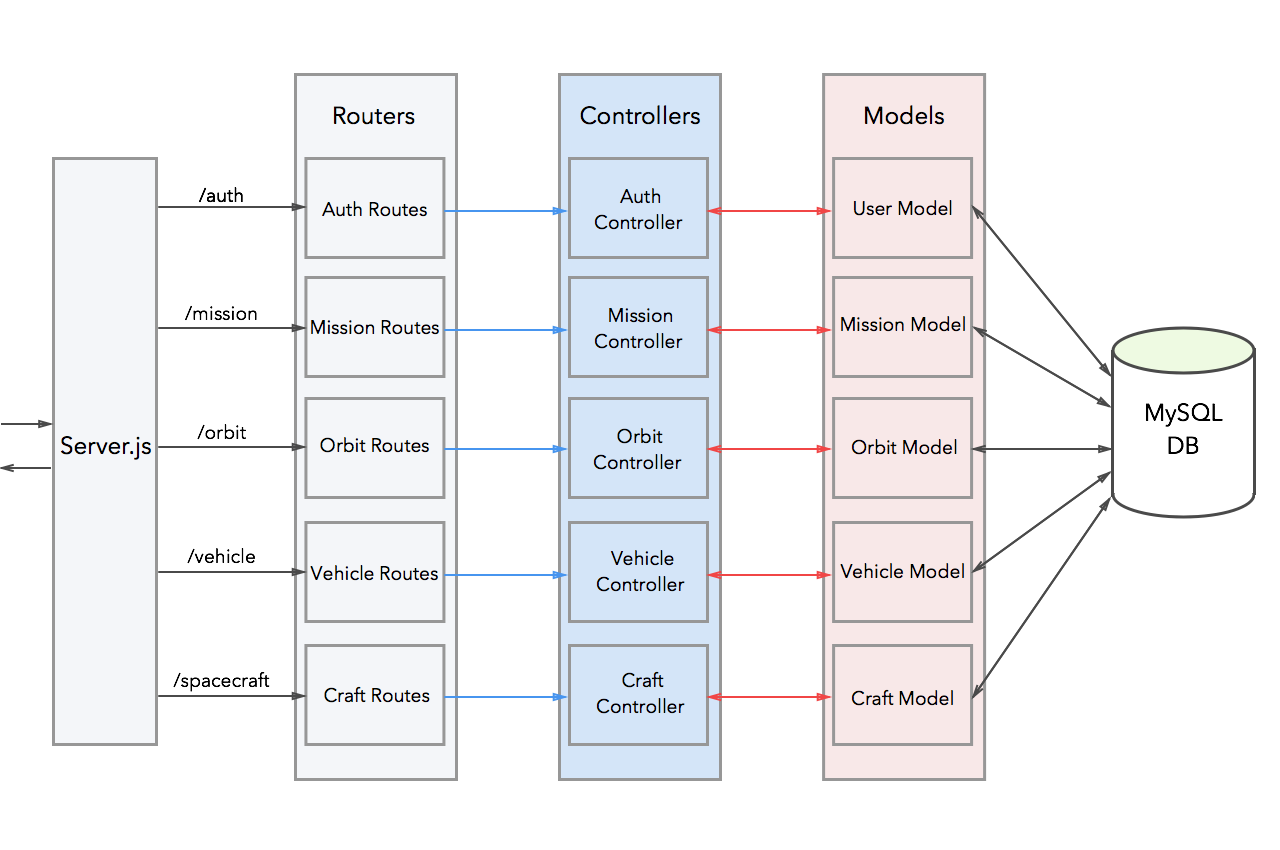
The primary components of our server are the main file "server.js", middleware(not shown), routers, controllers, models, and lastly our database. The main server.js file will typically handle the basic server setup. Optionally if we have a detailed configuration in terms of logging, security, and routing, we may want to create that logic in a separate middleware file, which we would then inject into the main server file.
Lets follow the journey of one request through this server to understand how these pieces fit together. We know any incoming HTTP request has a type, a url, and probably a bunch of other meta data. Lets take a GET request to the url "/mission/meta/:missionID". This would be used for the client to fetch all meta data for a given mission.
First, the request hits our server, and then is channeled to the "Mission Routes" router based on its base url "/mission". Then inside the Mission Router, the remainder of the url "/meta/:missionID" is examined. The router uses that url to determine which controller function to invoke. In this case it invokes a general getData method inside the Mission Controller.
Each controller has a set of methods. Their role is to accept the http request and response, invoke the appropriate model function, and send the response back to the client.
The models are our link to the database. Inside the models we handle all our querying (fetching and writing) to the MySQL database. When the getData method is invoked, it invokes a similar function in the Mission Model, which uses the ":missionID" in the request url parameters to fetch that mission's meta data send send it back to the controller. When the controller receives the response, it then determines if the fetch was successful. If so, it sends back the mission data to the client inside of the HTTP response object.
The same principles apply to the rest of our server, with each section handling a different categories of information.
Now that we have the structure in mind, lets jump into some code, starting with the main server file.
//Server.js

var express = require('express');
var passport = require('passport');
var session = require('express-session');
var cors = require('cors');

//Configure auth for deployment/local development
if (process.env.PORT) {
  var auth = require('./config/auth.deploy.js');
} else {
  var auth = require('./config/auth.js');
}

//Configure our port for deployment/local development
var port = process.env.PORT || 3000;

//Our app is an instance of express
var app = express();

//Enable CORS (Cross Origin Resource Sharing);
app.use(cors());

//Use session based authentication
app.use(session({ secret: auth.secret }));

//configure our server with all the middleware and and routing
require('./config/middleware.js')(app, express);

//Our server will listen on the port determined above
app.listen(port);

console.log("Listening on port: ", port);

//export our app for testing and flexibility
module.exports = app;
Here we set up the top level file of our server. Some of these things we've covered in the last blog, but there are a few additions. The first thing we do is set up some variables based on whether we are developing locally or on a deployed version of the server. To do this we check for the existence of a process environment variable named "PORT". If this exists, we know we are developing on our deployed version. Based on that, we will load in some keys that we will use to manage user sessions on the server.
Another thing we do is enable CORS, which among many things, can allow our API to be accessed even when requests do not originate from our site's domain. This is useful if we want to have an open API that can be accessed outside of the ecosystem of our application.
The last new thing we do is inject our middleware into the server using a require statement. Note this will actually be a function, which we invoke with our app and express as the arguments. Now lets jump into some middleware.
//Middleware.js

var morgan = require('morgan');
var bodyParser = require('body-parser');
var passport = require('passport');
var fs = require('fs');
var ipfilter = require('express-ipfilter');

module.exports = function (app, express) {
  // Logging
  var accessLogStream = fs.createWriteStream(__dirname + '/access.log', {flags: 'a'})
  app.use(morgan('combined', {stream: accessLogStream}))

  //bodyParser for processing post request body data
  app.use(bodyParser.urlencoded({extended: true}));
  app.use(bodyParser.json());

  //serving all of the static files from the client directory
  app.use(express.static(__dirname + '/../../client'));

  //Blacklisting
  var blist = fs.readFileSync(__dirname + "/blist.txt", "utf8");
  var ips = blist.split("\n");
  app.use(ipfilter(ips));

  //Routing
  //First create all necessary routers
  var authRouter = express.Router();
  var userRouter = express.Router();
  var missionRouter = express.Router();
  var orbitRouter = express.Router();
  var craftRouter = express.Router();
  var vehicleRouter = express.Router();

  //Make our app use all the routers we define
  app.use('/auth', authRouter);
  app.use('/users', userRouter);
  app.use('/mission', missionRouter);
  app.use('/orbit', orbitRouter);
  app.use('/spacecraft', craftRouter);
  app.use('/vehicle', vehicleRouter);

  //inject our routers into their respective route files
  require('../routers/authRoutes.js')(authRouter);
  require('../routers/userRoutes.js')(userRouter);
  require('../routers/missionRoutes.js')(missionRouter);
  require('../routers/orbitRoutes.js')(orbitRouter);
  require('../routers/craftRoutes.js')(craftRouter);
  require('../routers/vehicleRoutes.js')(vehicleRouter);
};
Using this middleware, we set up the vast majority of our server configuration and routing. We require a few new node modules, which we'll get to in a minute. Note the majority of the file is in a function, which is exported using module.exports. This is how we make this function available in server.js, where we actually invoked this function.
Starting from the top, we set up our access logs. This requires two node modules: "morgan" and "fs". We use morgan to get the incoming http request meta data, and fs to write that data to a file in storage. The result of this is that we have a text file in memory that stores information about every incoming request that hits our server. You may find this very useful down the road.
Next, we use body-parser, just as in the last post, to process request body information. Following that, we use a very useful command: the "express.static" method. There are a few variations of this, but what it is essentially doing is saying for all get requests to the base route "/", so anyone who navigates to our site's url, serve them all of the public files in the client directory. This is how we serve them everything they need to run our application all at once.
Next, we have a minor security operation. We use a node module called "express-ipfilter" in combination with "fs" to read a list of ip addresses from a text file. We use the ipfilter to block this list of ips from accessing our server. This is just a simple way of blacklisting different ip addresses.
The last thing we do is set up the routers for our server. First we create a separate router for category of data. Next, we tell our app to use each of these routers with the appropriate base route. Ex. any route that starts with "/users" will be chanelled into our userRouter. Lastly, we inject each of these routers into their appropriate routing files by requiring each of those files and passing the individual router as the argument to the function we have loaded in.
Next we'll go over one slimmed down version of a routes file, and its associated controller and model. We'll include just one method in each code snippet to demonstrate the functionality. First we have a piece of the Mission Routes file.
//MissionRoutes.js

var missionController = require('../controllers/missionController.js');

module.exports = function (app) {

  app.get('/meta/:missionID', missionController.getMetaData);

}
Here we require our Mission Controller. Inside the main function, we have one route for GET requests to "/meta/:missionID". When this route is hit, we invoke the getMetaData method in our Mission Controller.
//MissionController.js

var missionModel = require('../models/missionModel.js');

module.exports = {

    getMetaData: function (req, res) {
      missionModel.getMetaData(req.params.missionID, function (err, missionMeta) {
        if (err) {
          console.error(err);
          res.status(404).send(err)
        } else {
          res.status(200).json(missionMeta[0]);
        }
      });
    }

}
Here our exports are an object, in this case with a single property, corresponding to the method we invoked above. The one thing we require here is the Mission Model. When this method is invoked, it in turn invokes the getMetaData method on the Mission Model, passing in two arguments: the missionID from the request url parameters, and a callback function. It is the arguments to the callback function that will determine whether or not the DB query was successful or not, and we send different results back to the client based on the outcome. Next up is the Mission Model itself.
//MissionModel.js

var db = require('../db/connection.js');

module.exports = {

  getMetaData: function (missionID, callback) {
    db.query('select * from mission where id = ?', [missionID], function (err, missionMeta) {
      if (err) {
        callback(err);
      } else {
        callback(null, missionMeta);
      }
    });
  }

}
Here we require a direct connection to our database, which we established in a separate file. We can query directly off of this connection, which we have assigned to the variable "db". When this method is invoked, we execute a database query, passing in three arguments: The MySQL query string itself, the missionID passed into the method(which will be inserted into the query string), and an additional anonymous callback function. This is a great example of how we can execute server tasks asynchronously using callbacks. The arguments of the anonymous callback tell us about the success/failure of the query. Inside the body of this anonymous function, we have two cases: one where the query failed, so we invoke the orginal callback(the one we passed in from the Mission Controller) with an error object. In the other case, we invoke that original callback with the results of the query, the actual mission metadata. If you look back at the Mission Controller, you can see how we conditionally handle sending back the results data to the client in the HTTP response object.
For completeness, I want to also show how we establish this connection with our MySQL database.
//Connection.js

var mysql = require('mysql');

var connection = mysql.createConnection({
    host: 'localhost',
    user: 'root',
    password: 'somePassword',
    database: 'someDatabaseName'
});

connection.connect(function(err) {
  if (err) {
    console.error(err);
  } else {
    console.log('Database is connected');
  }
});

module.exports = connection;
Here we require the "mysql" node module, and use that to create a connection with our database, specifying the host name, user name, password(optional), and the specific database name.
We then invoke the connect method to actually establish our connection. Note we assign this connection to a variable called "connection", which we then use at the end of the file to export the connection itself. This is what allows to directly query the database in our different models.
And thats it!
We've covered a lot of different things in this post, and hopefully you can use these snippets as a reference when building your express servers. Again this is really just one of many implementations of an express server. What I like about this server structure is that it really maintains modularity and a separation of concerns. This way if you want to build out a lot more functionality, you won't end up with cluttered and unreadable server files. Additionally, new developers can generally find exactly where they need to look when they want to work on a specific section of the server.