Intro to Three.js, Part 2 - Creating a Dynamic Earth-Moon System
03 Feb 2016In this post: 3D graphics, three.js, camera motion, simulations.
Today, we will continue to build off of the earth model we created in the last post. To see the full code for this post, check out the github repo
Remember: When you start using texture maps, you will need to host your files locally to avoid cross-origin errors. I recommend running "python -m SimpleHTTPServer" from the root of your directory. Check out the bottom of the last post for more info.
Overview
- Add camera control via mouse movements with orbit controls
- Make the earth rotate and add a cloud layer
- Adding a starfield
- Adding the moon/making it orbit the earth
- Demonstrate a basic flyby
Orbit Controls
In our past example, the camera in our scene was static. It did not rotate or move, and we couldn't change the view using the mouse. It would be nice to make this scene interactive, and allow the user to change the camera's postion and orientation using the mouse. Normally this would be challenging, but thanks to @mrdoob, we have a great helper file that takes care of this for us. First we have to be sure to add the orbit-controls.js file in our header, then add the following line after we have created our renderer and camera.
//Orbit Controls
var orbit = new THREE.OrbitControls( camera, renderer.domElement )
Now we can zoom in and out and pivot the camera to view different parts of the scene.
Earth Rotation and Cloud Layer
Our model of the earth looks a bit static, so lets first give the earth a slight rotation. In general, when we want to give our objects or our camera motion, we will do this inside of the render method. Inside the render method, we can update the the attributes of the different objects in our scene, then when the scene is re-rendered, it will reflect those new properties. When we create a mesh, which I'll refer to as an object, we assign it to a variable. Using this variable, we can access different properties and methods on the object itself. The two properties I want to focus on in this post are the position and rotation properties. To introduce a rotation for the earth, we will use the following syntax:
//Render loop
var render = function() {
  //Rotate the earth about the y-axis
  earth.rotation.y -= .0005;

  renderer.render(scene, camera);
  requestAnimationFrame(render);
};
render();
When we think about rotations, we want to think of them as a rotation about an axis. We want to rotate the earth in the East-West direction. If we recall that the y axis is the vertical pointing axis in the scene, we can see that we need to rotate the earth about the y-axis to get the desired rotation.
Now every time the render method is invoked, it will increment the roation by that small value. As the render loop occurs 60 times per second, this will give us a reasonably quick rotation. (The Mars in the sidebar is nearly identical in terms of code, it just has a different texture map).
Adding some motion gives our graphic a lot more value, lets take it a step further by adding a cloud layer to the scene, and giving it a rotation speed slightly different than that of the earth itself. The way we will impement the cloud layer will be to create a new sphere object, with a radius slightly larger than that of the earth. Lets jump into the code and go over the details afterwards.
//Cloud Geomtry and Material
var cloudGeometry = new THREE.SphereGeometry(10.3,  50, 50);
var cloudMaterial = new THREE.MeshPhongMaterial({
  map: new THREE.ImageUtils.loadTexture("/images/clouds_2.jpg"),
  transparent: true,
  opacity: 0.1
});

//Create a cloud mesh and add it to the scene.
var clouds = new THREE.Mesh(cloudGeometry, cloudMaterial);
scene.add(clouds);
As we can see, adding the cloud layer is quite similar to creating the earth. We first create a sphere geometry with a radius of 10.3 (the earth is 10). Next, we create a MeshPhongMaterial, only this time we wrap a cloud texture map around the sphere. The other two properties in the material are critical. First we set the transparent boolean property to true, otherwise it would completely mask the earth sphere. We then give the material an opacity value of .1 (out of 1), meaning it is mostly transparent. Any value between about 0.05-0.2 will look reasonable. The last thing we have to do is build the mesh, assign it to the variable clouds, and add it to the scene.
We should add a rotation to the clouds before we move on. In reality, the clouds rotation would be quite complex, but for the sake of demonstration, we'll just make the clouds rotational speed half that of the earth.
//Render loop
var render = function() {
  //Rotate earth and clouds about the y-axis
  earth.rotation.y += .0005;
  clouds.rotation.y -= .00025;

  renderer.render(scene, camera);
  requestAnimationFrame(render);
};
render();
Our graphic will now look as follows:
There are a few other things we could add to the earth to improve its appearance, including bump and specular texture maps. A bump texture would make the surface of the earth a more three dimensional texture, for example making the mountain chains appear to jut out from the surface of the planet. The bump map does not actually change the shape of our object, however, instead using a careful manipulation of pixel colors to make the surface of the object appear three dimensional. It can be hard to implement, as well as reduce the resolution of our object when viewing it at a close distance. A specular map can make different parts of the surface reflect light differently. For now, we'll skip both of those and move on to different parts of the scene.
Adding a Starfield
Now that we have a solid model of the earth, lets add a starfield in the background to make the scene more realistic. To do this, we'll be making another spherical object, this time with a radius about 1000 times that of the earth.
//Starfield
var starGeometry = new THREE.SphereGeometry(1000, 50, 50);
var starMaterial = new THREE.MeshPhongMaterial({
  map: new THREE.ImageUtils.loadTexture("/images/galaxy_starfield.png"),
  side: THREE.DoubleSide,
  shininess: 0
});
var starField = new THREE.Mesh(starGeometry, starMaterial);
scene.add(starField);
Fundamentally, the starfield is not very different from the earth object. First, we create a new sphere geometry with a radius of 1000. This number is somewhat arbitrary, the main thing we want is for it to be significantly larger than the earth, yet smaller than the dimensions of the renderer. Our scene will effectively live inside of this sphere. To make the starfield material, we create a new MeshPhongMaterial, giving it a texture map that is a large rectangular picture of a starfield. Where this gets interesting is with the next property: "side: THREE.DoubleSide". Here we tell three.js to wrap our texture map on the interior surface of our sphere, hence we can see the stars from the inside. Note we also set the shininess to 0, which will make it so our starfield does not reflect any of the light coming from our directional light. After we create the starField object, we add it to the scene.
Adding the moon and creating an orbit
The last object we'll add before the final demo will be the moon. As you might expect, the moon will be another sphere with its own texture map. In reality, the moon is about 1/4 the size of the earth and over 200,000 miles away. For this post, we'll enlarge the moon slightly, and bring it in closer to the earth.
//Moon
var moonGeometry = new THREE.SphereGeometry(3.5, 50,50);
var moonMaterial = new THREE.MeshPhongMaterial({
  map: THREE.ImageUtils.loadTexture("/images/moon_texture.jpg")
});
var moon = new THREE.Mesh(moonGeometry, moonMaterial);
moon.position.set(35,0,0);
scene.add(moon);
The only difference here is that we set the initial position of the moon to be at +35px on the x-axis, as the default position at the origin would place it inside the earth. Before we render this, lets put in the logic necessary to make the moon orbit the earth. To do this, lets think about the path that we want the moon to follow. The simplest orbit to implement will be a circular orbit that rests in the X-Z plane, with no vertical motion in the Y direction. In this case, our x and z positions will continuously change, but the radius of our orbit will remain constant. A problem like this is best solved using polar coordinates.
If you are familiar with converting cartesian coordinates into polar coordinates, feel free to skip this section. In short, the relationship between the two can be shown rather concisely.
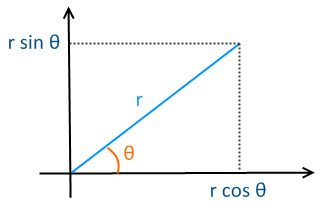
In 2D polar coordinates, we measure two things for any given point: r, the distance from our point to the origin, and Ø (theta), the angle that extends from the positive x-axis to the vector r which connects our point to the origin. To update our orbit using polar coordinates, we simply have to increment or change the value of Ø, while keeping the r value constant. Switching from polar coordinates to cartesian is quick operation that just requires a bit of trigonometry. To find the x value of our point, as shown in the diagram, we take r * cos(Ø). Similarly, we can find our y value with r * sin(Ø).
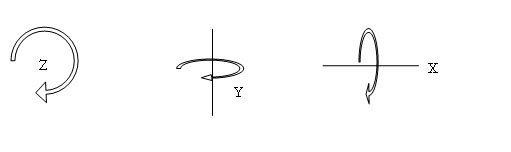
In three.js, we have to update the objects position using cartesian coordinates. We'll make the calculations for the orbit update using polar coordinates, then convert back into cartesian coordinates before setting the objects new position. Note that we will use z instead of y in three.js, as it uses a right-hand coordinate system where the horizontal plane is actually the x-z plane. Lets jump into the code.
//Set the moon's orbital radius, start angle, and angle increment value
var r = 35;
var theta = 0;
var dTheta = 2 * Math.PI / 1000;

//Render loop
var render = function() {
  earth.rotation.y += .0005;
  clouds.rotation.y += .00025;

  //Increment theta, and update moon x and y
  //position based off new theta value
  theta += dTheta;
  moon.position.x = r * Math.cos(theta);
  moon.position.z = r * Math.sin(theta);

  renderer.render(scene, camera);
  requestAnimationFrame(render);
};
render();
Outside of the render method, we intialize the three variables we will need. We set the radius of our orbit to 35, and our starting angle theta to 0. Setting theta to 0 ensures that the moon will start on the positive x-axis (where we placed it earlier). The third variable we create is dTheta, which is the amount that we will increment theta by in each invocation of the render method. 2 * PI in radians is a full circle, so 2 * Math.PI / 1000 declares that it will 1000 increments to complete one full revolution. (this will still be quite fast).
Inside the render method, we introduce 3 new lines. First, we increment theta by dTheta. Next, as described just above, we use the new value of theta along with r to convert our polar coordinates to valid x and z values before setting the moon's new position. Orbits will get get more complicated when we add motion in the vertical direction, and we'll have to use spherical coordinates, but the principal is the same and can be applied for any orbits you want to implement.
Flyby Simulation
To finish this post, I want to give you a basic idea of the kinds of things you can do with a model like this. Having rotation, an orbiting moon, and responsiveness to mouse movements is awesome, but I think one place where three.js really shines is in simulations. In this case, we are going to simulate a flyby of the earth by moving the camera through the scene programatically. We'll start with the code, which will again take place mostly inside the render method.
//Vector pointing towards the earth
var earthVec = new THREE.Vector3(0,0,0);

//Set position increments
var dx = .01;
var dy = -.01;
var dz = -.05;

//Render loop
var render = function() {
  earth.rotation.y += .0009;
  clouds.rotation.y += .00005;

  //Update the camera position
  camera.position.x += dx;
  camera.position.y += dy;
  camera.position.z += dz;

  //Flyby reset
  if (camera.position.z < -100) {
    camera.position.set(0,35,70);
  }

  //Point the camera towards the earth
  camera.lookAt(earthVec);

  renderer.render(scene, camera);
  requestAnimationFrame(render);
};
render();
The first thing a vector called earthVec. We initialize it with the points (0,0,0). This is going to be useful because as we move our camera, it will not automatically update its orientation, instead continuing to point in its original direction. We can use this vector to point our camera in the desired direction after each movement. Next, we create our position increments dx, dy, and dz, which are they values that we'll add to the camera's x,y, and z positions at each render. The main reason I defined these increment variables outside of the render loop is because this way we can change there values and not worry about touching anything inside our render method.
I've left out the moon orbit logic for the sake of space, but in the demo it is still present. Inside the render method itself, we update the camera's postion accordingly using our dx, dy, and dz increments. The next line is an optional piec of logic that resets our simulation if the z coordinate is less than -100, this way our simulation will repeat indefinitely. The last new line uses our earthVec to point the camera towards the earth after the camera position update. Now our camera will always be pointing at the earth. The result of all this will be a close flyby of the earth, that moves down, to the left, and into the screen. When you think about how few extra lines this simulation took, it opens up some amazing opportunites for more complex simulations.
If you have made it this far, thanks for reading! I hope you found this blog post useful, and please feel free to reach out to me on gmail or twitter with any questions or comments.